I’ve spent years searching for a home automation system that meets my needs, which is not an easy task. My criteria is a little strict on what I will allow into my private life and home.
What started as a want to control the sprinkler from my phone lead down a dark and lonely path, full of shady vendors wanting into my private network to scrape my data. Looking at commercial solutions left me discouraged, around every corner someone trying to take your data for their own use (looking at you amazon…)
During the search for the perfect solution a few key pieces fell into place:
- I discovered Home Assistant and began using it to collect all of my devices into a single dashboard. My data stays home (mostly)
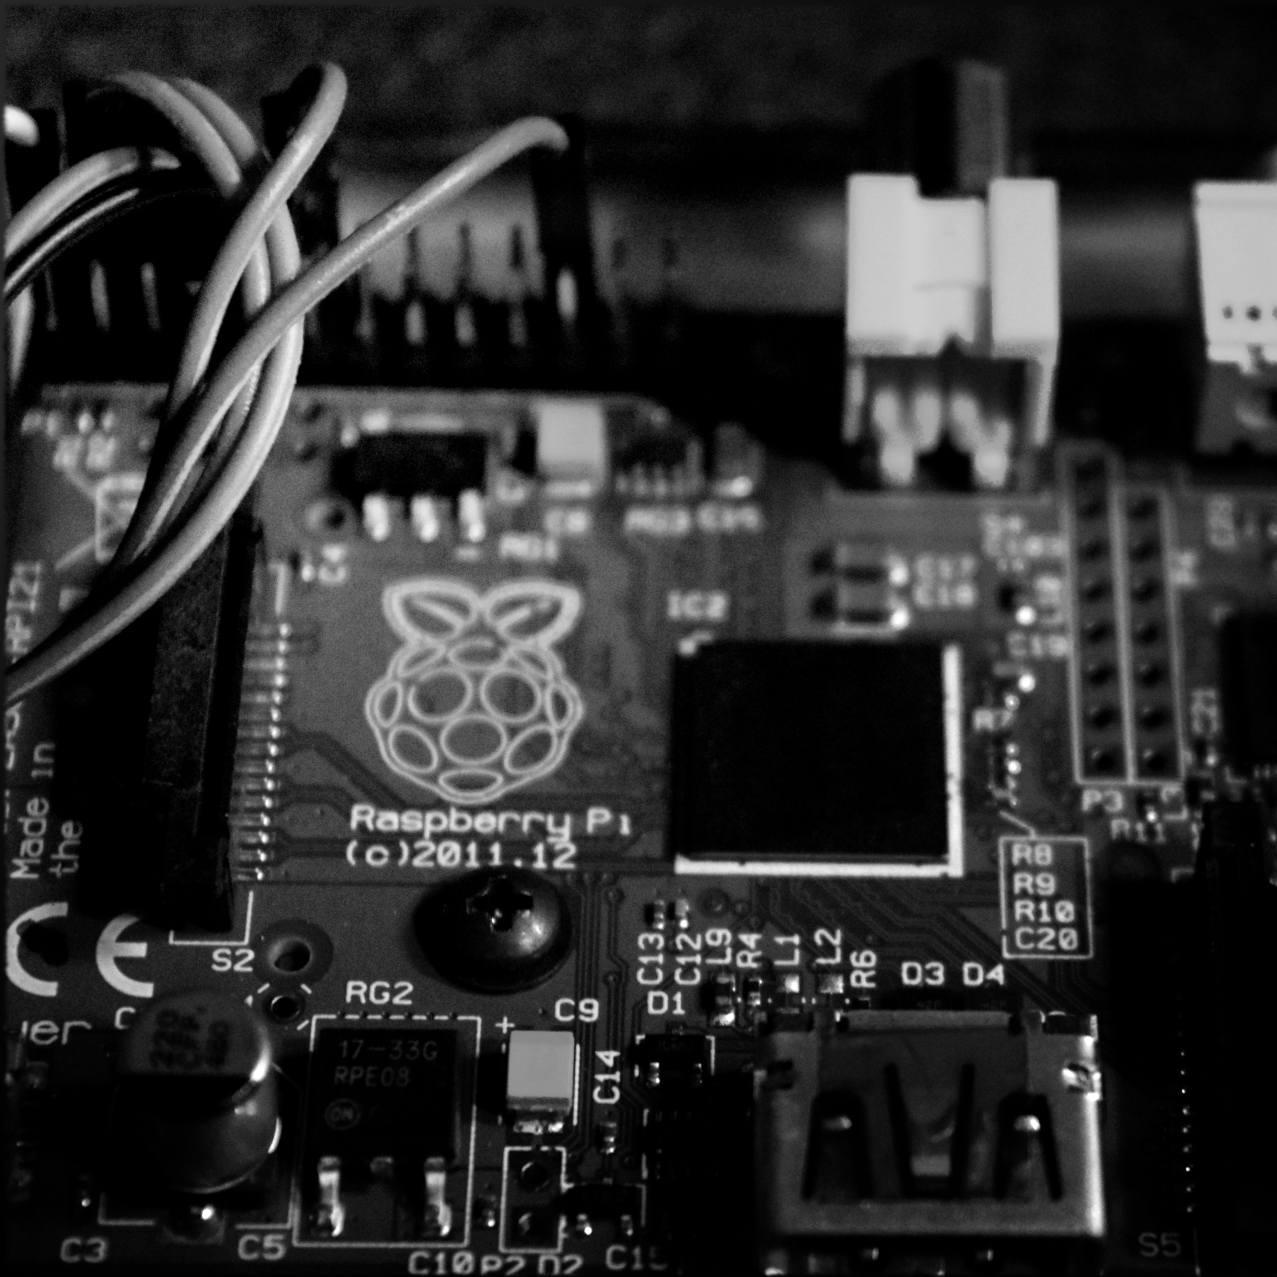
- I was given 30+ old Raspberry Pi’s that were installed in a commercial application that was sunset and removed. Instead of the dumpster I gave them a new home.
Now I just needed a way to use all of these old Raspberry Pi’s to interface with my world and home assistant.
Enter Room-Assistant!
Using recycled hardware, Open Source projects, some time and ingenuity, I’ve managed to automate my house!
I settled on building custom devices on the Room assistant platform, communicating with Home Assistant through MQTT, using Raspberry Pi single board computers.
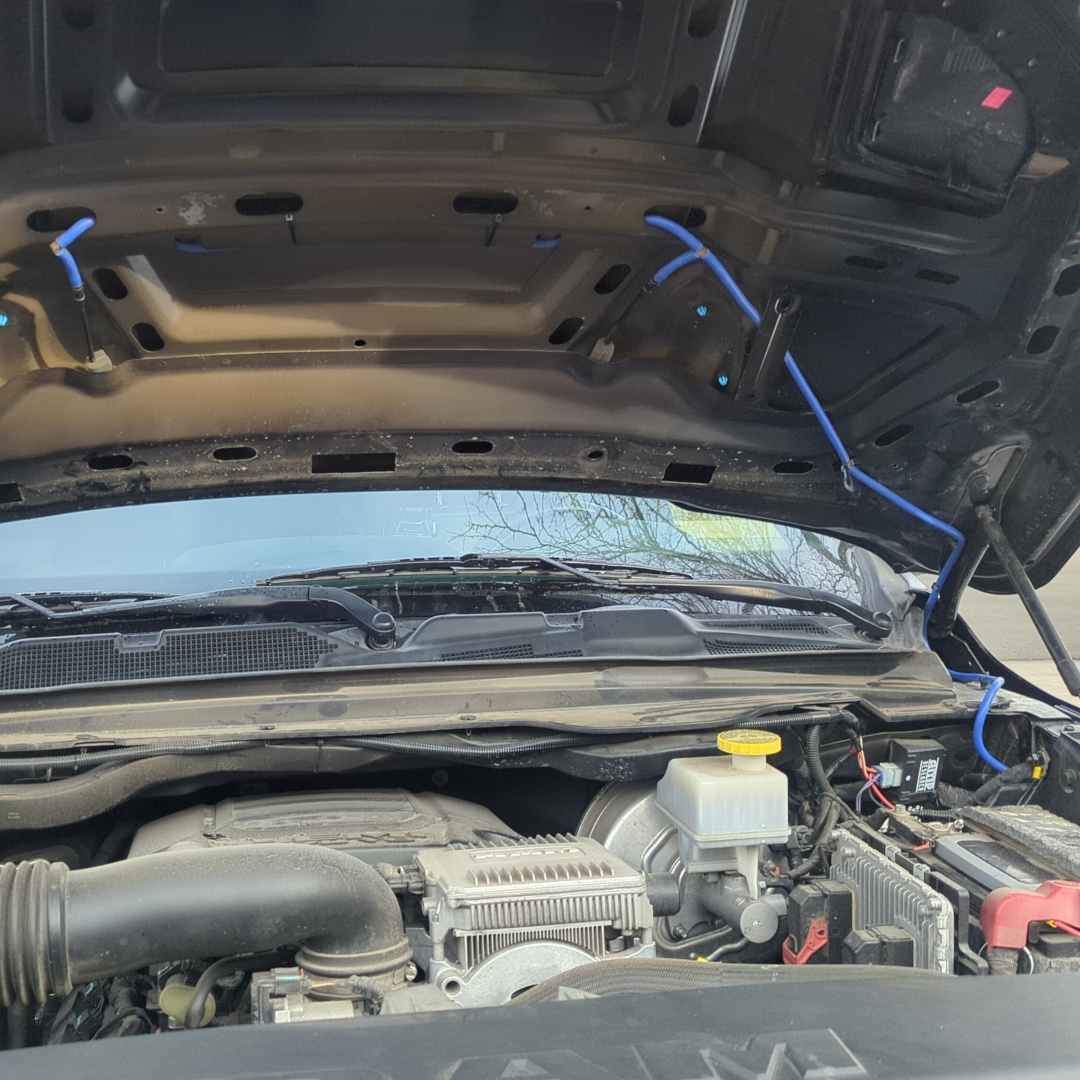
These Raspi’s came with nice little milled aluminum cases that keep the pi cool that allows a variety of devices to be mounted to the case, such as relay boards and occupancy sensors. Off to building some IoT devices to make controlling our environment easier and more efficient.
Once I had the software installed and all of the required packages configured deploying a device could not be easier. Setup the GPIO pins for the devices you are using and start the system. MQTT connections and sensor additions happened automagically in Home Assistant and began talking immediately.
Deployed devices
The table below contains all of the devices I have deployed using the home assistant software and these old raspi’s. I’ve included the config files and scripts used to set these devices up in their respective blog pages.
| Room | Device Use | Config |
|---|---|---|
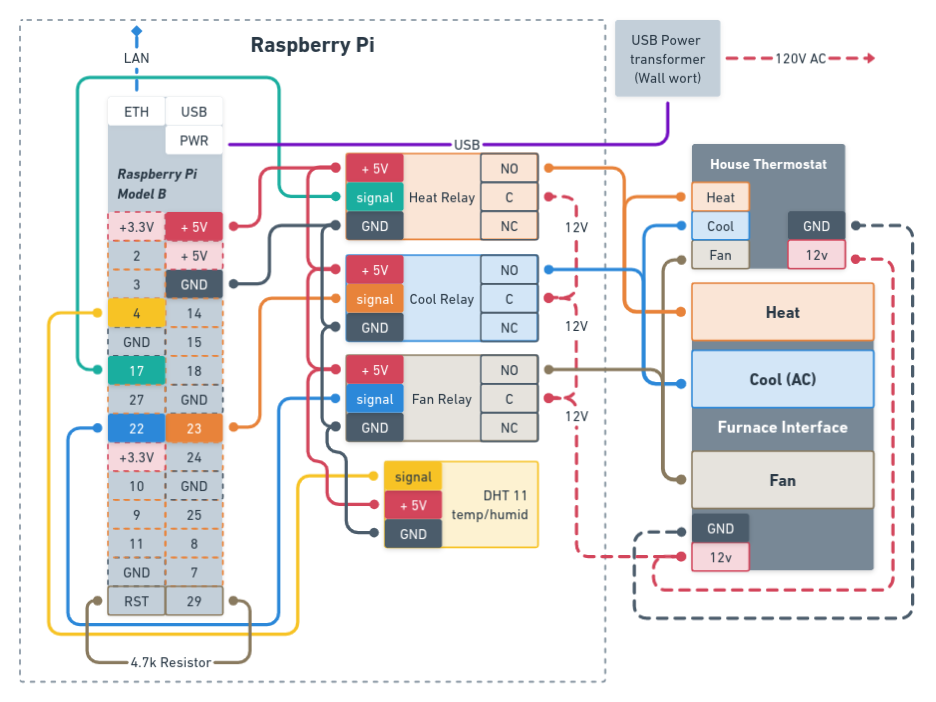
| Furnace | Relays connected through the furnace heat, cool and fan functions, temp/humid sensor in the return air path. Wired in parallel with wall thermostat for backup control of the furnace. Wall unit is switched off. | Furnace Config File |
| Kitchen | Temperature/humidity, motion, light control. Connected through Ubiquity Pico station as a client for remote network location | Kitchen Config File |
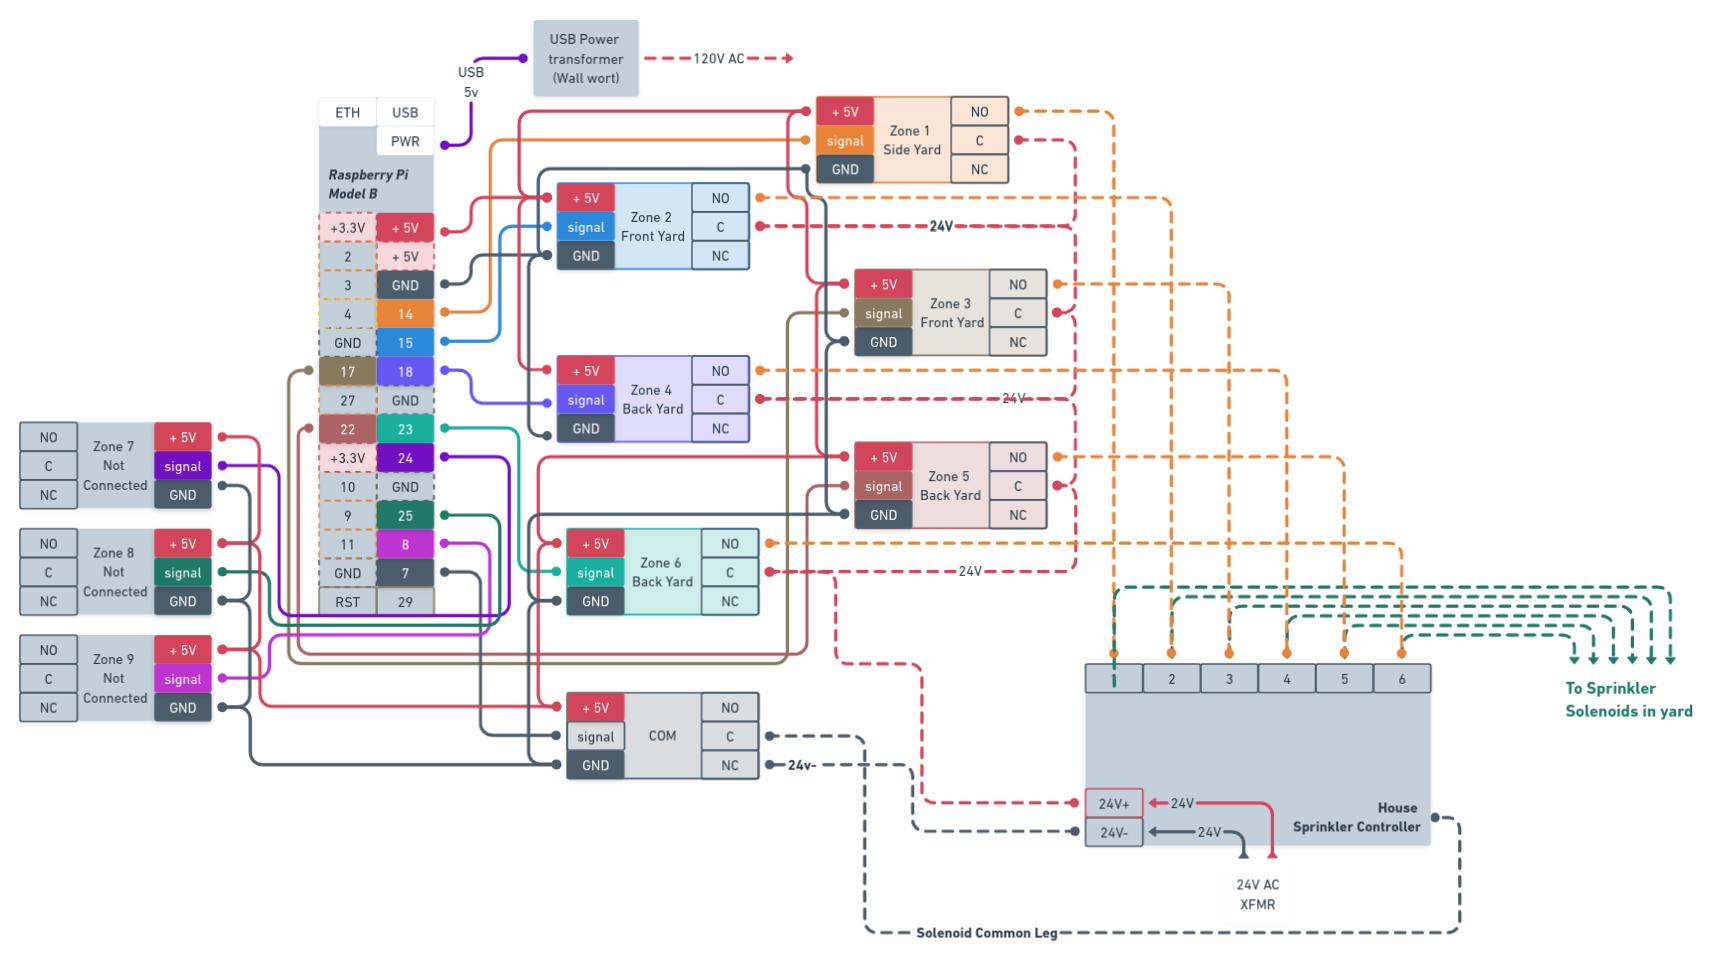
| Sprinkler | Sprinkler controls for 6 zones plus the common leg to sprinkler solenoids This is connected in parallel with the usual sprinkler controller allowing either to activate zones as needed. Also connected through a physical switch to activate individual zones. | Sprinkler Config File |
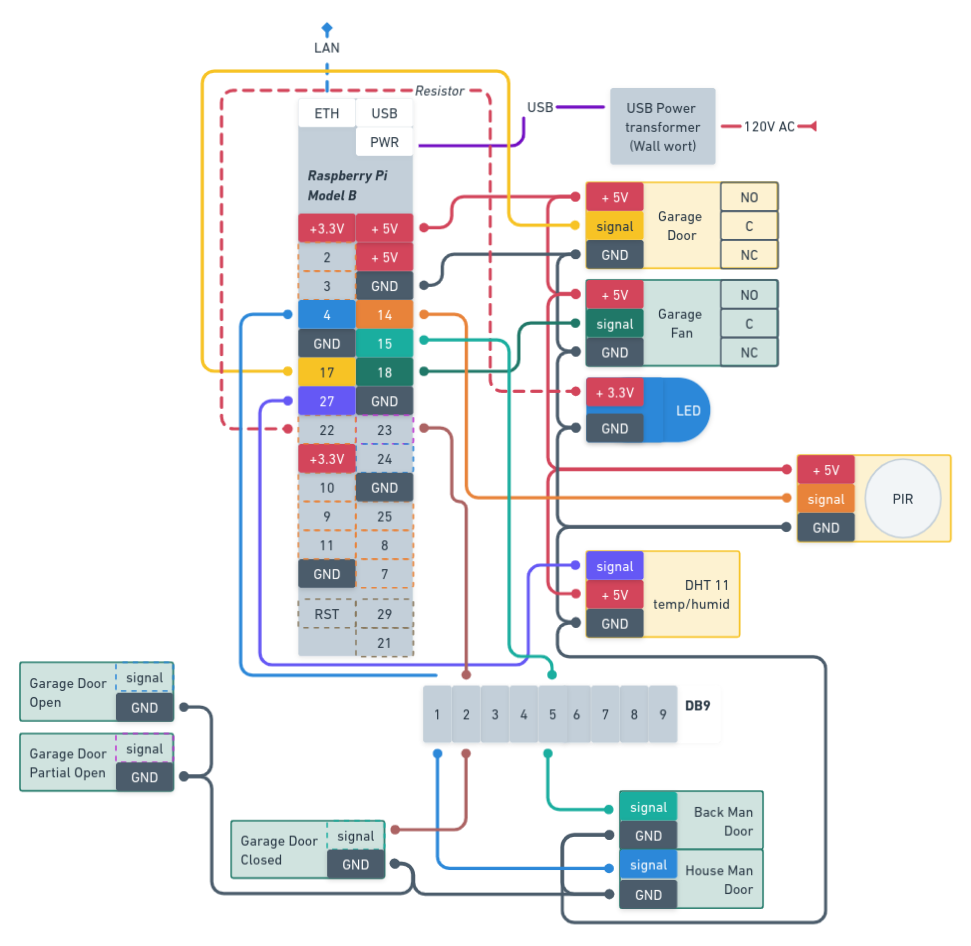
| Garage | Garage door control, temp sensor, overhead fan, door monitoring, motion sensor. | Garage Config File |
| Office | Test bed for room assistant installs. Motion sensor and relay for lights poorly implemented | Office Config File |
Typical installation
Raspberry Pi Model B v1 (arm6) setup
Installing and configuring the raspi to work with home assistant as a stand alone room instance. This allows a variety of automation and sensor measurements to be easily deployed.
Install OS
Using the latest raspiOS found at The Raspberry Pi site install to an SD card
raspi-config
- resize fs
- change localization/keyboard
- change password
- set hostname
- enable ssh
- enable camera
- set over-clock to medium
- set GPU to 144
Update && upgrade
sudo apt-get update && sudo apt-get upgrade -y && sudo reboot
Install Room-Assistant
I use the node version of the room-assistant package. Though there are other ways to run that may suit your needs, this fit mine just fine and works, the most important point!
Install Node Arm6l
Following the guide at https://www.room-assistant.io it points us to install version 14 or 12 of NodeJS. to accomplish this on the arm6 chip follow these steps.
wget https://unofficial-builds.nodejs.org/download/release/v12.18.3/node-v12.18.3-linux-armv6l.tar.gz
tar -xzf node-v12.18.3-linux-armv6l.tar.gz
cd node-v12.18.3-linux-armv6l
sudo cp -R * /usr/local
check the node version with node --version
Dependencies
With that out of the way install dependencies for the control software.
sudo apt-get install libavahi-compat-libdnssd-dev
Installation
sudo npm i --global --unsafe-perm room-assistant
Create a Service
Add this to systemd to enable automatic restarts after power loss.
edit/create the file nano /etc/systemd/system/room-assistant.service
[Unit]
Description=room-assistant service

[Service]
ExecStart=/usr/local/bin/room-assistant
WorkingDirectory=/home/pi/room-assistant
Restart=always
RestartSec=10
User=pi

[Install]
WantedBy=multi-user.target
Enable the service on restart
sudo systemctl enable room-assistant.service
Install scripts
Install and configure scripts to suit installation.
For temp/humidity dht11 sensors, use the following command to install
sudo apt-get install -y python3-pip && sudo python3 -m pip install --upgrade pip setuptools wheel && sudo pip3 install Adafruit_DHT
Set permissions
chmod +x /home/pi/room-assistant/script/*
Configure Room-Assistant
Now that we have the packages loaded and the pi all up to date, create a room-assistant directory with sub-directories config, script. We will need to create a config file named local.yaml in the config file.
make the directory for the config to live
mkdir -p /home/pi/room-assistant/config /home/pi/room-assistant/script
See this example below for the basic structure and layout from my Furnace control device. This must be in valid YAML format to run the software.
# ########################
# Raspi Config
#   Crawl Space
#   Above furnace in crawl space
#   Monitor and control the furnace and crawl space
#   10.0.0.74
# ########################

# ############
# GPIO Pin-Out
# ############
# PIN: 4 AltFunction: | DHT11
# PIN: 17 AltFunction: | heat
# PIN: 22 AltFunction: | Fan
# PIN: 23 AltFunction: | AC
# PIN: 29 AltFunction: | reset

# #######################
# Global Config settings
# #######################
global:
  instanceName: crawlspace
  integrations:
    - homeAssistant
    - gpio
    - shell

# #######################
# Cluster settings
# #######################
# Config options for clustering multiple Room-Assistant
# Give leader more weight
cluster:
  weight: 1
  networkInterface: eth0
  port: 6425
  timeout: 60
  peerAddresses:
    # raspi1 patio
    - 10.10.10.70:6425
    # raspi2 office
    - 10.10.10.71:6425
    # raspi3 sprinkler
    - 10.0.0.71:6425
    #raspi4 kitchen
    - 192.168.1.75:6425
    # raspi5 crawlspace <-- this pc
#    - 10.0.0.74:6425
    # raspi6 garage
    - 10.10.10.73:6425

# #######################
# home assistant settings
# #######################
homeAssistant:
  mqttUrl: mqtt://10.10.10.21:1883
  mqttOptions:
    username: homeassistant
    password: {LONG_RANDOM_STRING}

# #######################
# GPIO settings
# #######################
gpio:

# #######################
# Switches settings
# #######################
  switches:

    # Relay 1 - Fan Run
    - name: Fan On
      pin: 22
      icon: mdi:fan

    # Relay 2 - AC RUN
    - name: Air Conditioning
      pin: 23
      icon: mdi:air-conditioner

    # Relay 3 - HEAT RUN
    - name: Heater
      pin: 17
      icon: mdi:fire

    # HARD Reset PIN
    - name: Crawl space reset
      pin: 29
      icon: mdi:power

# #######################
# Shell settings
# #######################
shell:
  sensors:

     # DHT11 Sensor reporting the temp °F result
    - name: Crawl Space Temperature
      command: 'python3.7 /home/pi/room-assistant/script/myDHT.py'
      regex: '(-?[0-9.]+)F'
      cron: '*/2 * * * *'
      icon: mdi:temperature-fahrenheit
      unitOfMeasurement: '°F'
      deviceClass: temperature

     # DHT11 Sensor reporting the humid % result
    - name: Crawl Space Humidity
      command: 'python3.7 /home/pi/room-assistant/script/myDHT.py'
      regex: '(-?[0-9.]+)%'
      cron: '*/5 * * * *'
      icon: mdi:water-percent
      unitOfMeasurement: '%'
      deviceClass: humidity

    # Script to check onboard temp sensor reading
    - name: Crawl Space CPU Temp
      command: '/home/pi/room-assistant/script/cpuTemp.sh'
      cron: '*/2 * * * *'
      unitOfMeasurement: F
      deviceClass: temperature

    # Script to check voltage and return boolean if no errors seen.
    # See the script for more
    - name: Crawl CPU Voltage
      command: '/home/pi/room-assistant/script/cpuVolt.sh'
      cron: '1 */1 * * *'
      deviceClass: power

    # Report CPU uptime in sec
    - name: Crawl CPU Up Time
      command: '/home/pi/room-assistant/script/cpuUp.sh'
      cron: '* * * * *'
      unitOfMeasurement: 's'

    # Free memory `free -h` results
    - name: Crawl CPU Free Memory
      command: '/home/pi/room-assistant/script/freeMem.sh'
      cron: '*/10 * * * *'
      unitOfMeasurement: 'MB'
Edit the configuration to suit the device at hand and start the system manually to verify function and catch any errors.
cd ~/room-assistant
room-assistant
Watch the console load the software and once complete check your home assistant dashboard for the new devices.
Once the system is running error free in the cli restart it using the system service setup earlier
sudo systemctl start room-assistant.service
Upgrading
Following the great room-assistant documentation updating is simple enough.
Stop the service for the time being:
sudo service room-assistant stop
Since we are using the node version, run the following to upgrade:
sudo npm i --global --unsafe-perm room-assistant
This is very process heavy and may take a long time on the pi. Recommend running in a
screensession to detach.
Config files and scripts live in the same locations and configuration directives *should not change across versions.
Have fun!