Sprinkler Raspi Overview
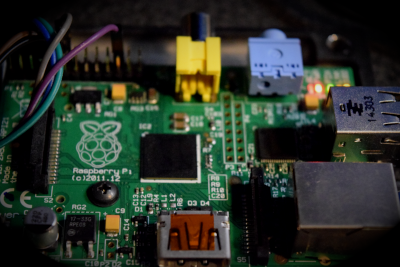
Raspberry Pi Model B v1 and a bunch or relays used as a smart sprinkler controller and extension of my Home Assistant installation.
Using an old raspberry pi Model B and a few relay boards I have control of my “dumb” sprinkler controller through parallel 24v connections to the yard solenoids. This allows greater functionality in my rental house by allowing the old, landlord provided, controller to function.
I additionally wired in a switch panel that allows for manual control of the zones in case the kids want to play, or I need to test functionality outside of software for things like blowing out the lines for winter.
- Sprinkler Zone Control
- *Future Rain Sensor
- *Future soil moisture sensor
Sprinkler Info and Use
The sprinkler controls present to home assistant as switches from the Room-Assistant instance running in the garage connected to the relay boards through GPIO pins.
This allows simple interfacing and automation. For that I have laid out these primary goals to achieve a quality sprinkler system.
- Full scheduling control of each zone
- Multiple schedules to allow for complex watering routines
- Easy manual control of all zones
- Status of any running zone
- Parallel control through the commercial controller, manual switches and automation software
- Rain sensing connected to reliable API’s and/or a rain sensor
- Outdoor temp and humidity monitoring
Wiring
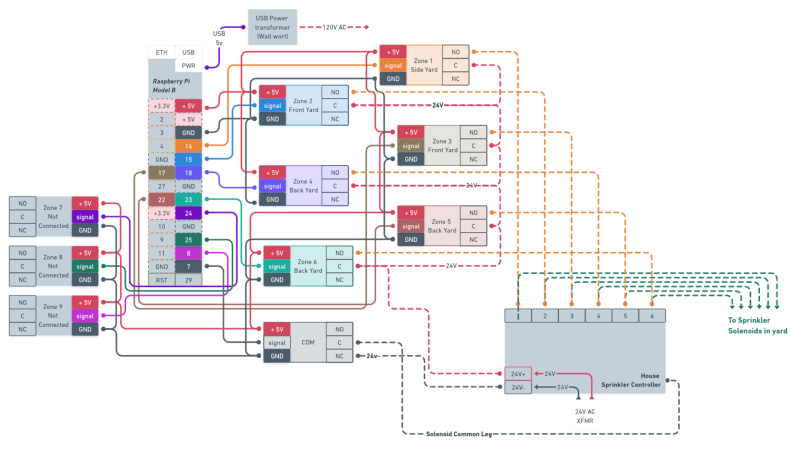
Everything wires to the GPIO pins of the Raspberry Pi and to solenoids in the yard as seen in the photo below.
Hardware
This controller is running Room Assistant living next to the existing off-the-shelf sprinkler controller provided with the house.
In order to keep the original sprinkler controller functional, the relays are wired in parallel to the controller. Additionally I added a bank of switches to the mix for good measure and over complexity!
The solenoid power is controlled through an 8 relay board, as well as an additional 2 relay board for a “rain cutout” that removes the common leg from the entire system (more on that later). These relays are controlled through GPIO pins on the Raspberry Pi
These relays are enrolled in the home assistant system and are controllable through the dashboard and with automatons.
Network and Power
Network and power are both at the device located in the garage equipment rack. Nothing of note here.
Controls
Relays controlling sprinkler zones handle the majority of the heavy lifting for this device.
Room-Assistant config excerpt:
gpio:
  switches:
    # Each zone wired into a relay to switch the 24V solenoid and release the water
    # Relay 1 - Side yard zone 1
    - name: sprinkler zone 1
      pin: 14
      icon: mdi:sprinkler-variant
Software
Following the great example set by Github user @rgconrad514 and the home-assistant sprinkler controller I integrated the controls of the GPIO on the raspi into home assistant.
This allows enabling of multiple schedules for each zone with individual zone run times allowing the city water schedules to be met.
Room Assistant Config
This config file is the meat and potatoes of the program. Find it in the /home/$USER/room-assistant/config/local.yml
# ########################
# Raspi Config
#   hass-raspi3
#   sprinkler controller - equipment rack garage
#   Yard sprinklers
#   [email protected]
# ########################

# ############
# GPIO Pin-Out
# ############
# PIN: 7 Sprinkler Power COM line (Rain Cut)
# PIN: 8 Zone 9 (NOT CONNECTED)
# PIN: 14 zone 1 side yard
# PIN: 15 zone 2 Front Yard
# PIN: 17 zone 3 Front Yard
# PIN: 18 zone 4 Back Yard
# PIN: 22 zone 5 Back Yard
# PIN: 23 zone 6 Back Yard
# PIN: 24 zone 7 (NOT CONNECTED)
# PIN: 25 zone 8 (NOT CONNECTED)

# #######################
# Global Config settings
# #######################
global:
  instanceName: sprinkler
  integrations:
    - homeAssistant
    - gpio
    - shell

# #######################
# Cluster settings
# #######################
# Config options for clustering multiple Room-Assistant
# Give leader more weight
cluster:
  weight: 2
  networkInterface: eth0
  port: 6425
  timeout: 60
  peerAddresses:
    # raspi1 patio
    - 10.10.10.70:6425
    # raspi2 office
    - 10.10.10.71:6425
    # raspi3 sprinkler <-- this CPU
#    - 10.10.10.72:6425
    #raspi4 kitchen
    - 192.168.1.75:6425
    #raspi5 crawlspace
    - 10.0.0.74:6425
    # raspi6 garage
    - 10.10.10.73:6425

# #######################
# home assistant settings
# #######################
homeAssistant:
  mqttUrl: mqtt://10.10.10.21:1883
  mqttOptions:
    username: homeassistant
    password: {LONG_RANDOM_STRING}
# #######################
# GPIO settings
# #######################
gpio:

# #######################
# Switches settings
# #######################
  switches:

    # Each zone wired into a relay to switch the 24V solenoid and release the water

    # Relay 1 - Side yard zone 1
    - name: sprinkler zone 1
      pin: 14
      icon: mdi:sprinkler-variant

    # Relay 2 - Front Yard zone 2
    - name: sprinkler zone 2
      pin: 15
      icon: mdi:sprinkler-variant

    # Relay 3 - Front Yard zone 3
    - name: sprinkler zone 3
      pin: 17
      icon: mdi:sprinkler-variant

    # Relay 4 - Back Yard zone 4
    - name: sprinkler zone 4
      pin: 18
      icon: mdi:sprinkler-variant

    # Relay 5 - Back Yard zone 5
    - name: sprinkler zone 5
      pin: 22
      icon: mdi:sprinkler-variant

    # Relay 6 - Back Yard zone 6
    - name: sprinkler zone 6
      pin: 23
      icon: mdi:sprinkler-variant

    # Relay 7 - NC
    - name: sprinkler zone 7
      pin: 24
      icon: mdi:sprinkler-variant

    # Relay 8 - NC
    - name: sprinkler zone  8
      pin: 25
      icon: mdi:sprinkler-variant

    # Relay 9 -
    - name: sprinkler zone 9
      pin: 8
      icon: mdi:sprinkler-variant

    # Relay 10 - COM power connection (rain cutout)
    - name: sprinkler COM
      pin: 7
      icon: mdi:sprinkler-variant

# #######################
# Shell settings
# #######################
shell:
  sensors:

    - name: Sprinkler CPU Temp
      command: '/home/pi/room-assistant/script/cpuTemp.sh'
      cron: '*/2 * * * *'
      unitOfMeasurement: '°F'
      deviceClass: temperature

    # Script to check voltage and return boolean if no errors seen.
    # See the script for more
    - name: Sprinkler CPU Voltage
      command: '/home/pi/room-assistant/script/cpuVolt.sh'
      cron: '1 */1 * * *'
      deviceClass: power

    # Report CPU uptime in sec
    - name: Sprinkler CPU Up Time
      command: '/home/pi/room-assistant/script/cpuUp.sh'
      cron: '* * * * *'
      unitOfMeasurement: 's'

    # Free memory `free -h` results
    - name: Sprinkler CPU Free Memory
      command: '/home/pi/room-assistant/script/freeMem.sh'
      cron: '*/10 * * * *'
      unitOfMeasurement: 'MB'

    - name: Sprinkler Wifi Strength
      command: 'iwconfig wlan0 | grep -i quality'
      regex: 'Signal level=(-?[0-9]+) dBm'
      cron: '*/30 * * * *'
      icon: mdi:wifi
      unitOfMeasurement: dBm
      deviceClass: signal_strength

#    - name: Sprinkler CPU Free Storage
#      command: '/home/pi/room-assistant/script/cpuStorage.sh'
#      cron: '1 * */1 * *'
#      unitOfMeasurement: 'GB'
#      deviceClass: timestamp
Scripts
Some additional helper scripts were also developed to return some info on the device for integrations and status’s over in home assistant.
Add these to room assistant using the shell.sensors function like this:
shell:
  sensors:

     # DHT11 Sensor reporting the temp °F result
    - name: Garage Temperature
      command: 'python3.7 /home/pi/room-assistant/script/myDHT.py'
      regex: '(-?[0-9.]+)F'
      cron: '*/2 * * * *'
      icon: mdi:temperature-fahrenheit
      unitOfMeasurement: '°F'
      deviceClass: temperature
cpuUp.sh
return the uptime in seconds formatted as int
#!/bin/bash

echo `cat /proc/uptime |awk '{print $1}' |cut -d '.' -f1`
cpuTemp.sh
return the CPU reported temp
#!/bin/bash

cpuTemp=`vcgencmd measure_temp |cut -d "=" -f2 |cut -d "'" -f1 | awk '{print ($1 *9/5) + 32}'`
echo $cpuTemp
freeMem.sh
returns the remaining RAM on the pi
#!/bin/bash

memfree=`cat /proc/meminfo | grep MemFree | awk '{print $2}'`;
memtotal=`cat /proc/meminfo | grep MemTotal | awk '{print $2}'`;


awk '/MemFree/{free=$2} /MemTotal/{total=$2} END{print (free*100)/total}' /proc/meminfo

#echo $(($memfree * 100 / $memtotal))
myDHT.py
adapted DHT11 temp sensor reading temp and humid
import Adafruit_DHT
import time

DHT_SENSOR = Adafruit_DHT.DHT11
DHT_PIN = 27

while True:
    humidity, temperature = Adafruit_DHT.read_retry(DHT_SENSOR, DHT_PIN)
    if humidity is not None and temperature is not None:
        temperature_f = temperature * (9 / 5) + 32
        print("Temp={0:0.1f}F Humidity={1:0.1f}%".format(temperature_f, humidity))
        exit()
    else:
        time.sleep(.05);
temperature_sensor_code.py
read DS18B20 sensor, report value in F
# Temp DS180b20 reading into F result on raspi
#
# https://pimylifeup.com/raspberry-pi-temperature-sensor/
# Modified from
#   - git clone https://github.com/pimylifeup/temperature_sensor.git

import os
import glob
import time

os.system('modprobe w1-gpio')
os.system('modprobe w1-therm')

base_dir = '/sys/bus/w1/devices/'
device_folder = glob.glob(base_dir + '28*')[0]
device_file = device_folder + '/w1_slave'

def read_temp_raw():
    lines = []
    i = 0
    # try to read the file 20 times, return the result
    while not lines and (i < 19):
        try:
            f = open(device_file, 'r')
            lines = f.readlines()
            i += 1
        except NameError:
            time.sleep(1)
        else:
            if not lines:
                f.close()
            else:
                f.close()
                return lines

def read_temp():
    lines = read_temp_raw()
    if lines[0].strip()[-3:] != 'YES':
        lines = read_temp_raw()
    equals_pos = lines[1].find('t=')
    if equals_pos != -1:
        temp_string = lines[1][equals_pos+2:]
        temp_c = float(temp_string) / 1000.0
        temp_f = temp_c * 9.0 / 5.0 + 32.0
        return temp_f

# print to reduced decimal place
print('{0:06.3f}'.format(read_temp()))
cpuVolt.sh
return boolean if no issues with voltage (power supply failure)
#!/bin/bash

THROTTLED=`/opt/vc/bin/vcgencmd get_throttled |cut -d "=" -f2`
RESULTS=0

if [[ "$THROTTLED" != *"0x0"*  ]];then
	RESULTS=1
fi

echo $RESULTS

